Managed Chromebook Camera app is not opening

Managed Chromebook Camera app is not opening

I work for a school that uses Google Suite and is using Chromebooks that are managed for the students. Many of these students will try to do everything they can to bypass filters and get into other mischief, so we have to apply settings to prevent that.

One of those settings was causing the pre-installed camera app from loading. The students would click the icon for the app, but the app would not load. The camera hardware was working fine as evidenced by Google Meet and the Okiocam camera app that I allowed to be installed until I could figure out the native Camera app problem.

I finally tracked down the issue to the Device Management > Users > Apps and Extensions settings for our student org unit. The first setting, “Allow users to install other apps and extensions” is set to “Block all other apps & extensions”. I had assumed this meant the setting would prevent students from installing any apps that were not added below the setting with “Allow install”. Apparently it will block the camera app since the camera app was not added.

The fix is to add hfhhnacclhffhdffklopdkcgdhifgngh with “Allow install” permission. In case that code no longer works, do a Google search for chromebook camera app id, and that should bring up the Chrome Web Store page for the camera app, then you can grab the ID from the URL in your browser’s address bar.

If the camera app URL is https://chrome.google.com/webstore/detail/camera/hfhhnacclhffhdffklopdkcgdhifgngh?hl=en, then copy the string of text after “camera/” and before the question mark. hfhhnacclhffhdffklopdkcgdhifgngh is the ID.

On the Device Management > Users > Apps and Extensions page for your sub org unit, click the plus button, then click the Chrome logo that appear above it. Paste the ID into the search box and press enter. The camera app should appear in the list and you can click “Select” and set the permission to “Allow install”.

That should fix the Camera app problem.

Brother HL-2280DW – How to reset the drum counter

Brother HL-2280DW – How to reset the drum counter

The instructions for resetting the drum counter for a Brother HL-2280DW laser printer are included with a new drum if the drum is an official Brother product.

But in case the drum is made by a 3rd party, you lost the instructions, or you glossed over the instructions specific to your model (like I did), here you go:

  1. After reinserting the drum and toner, leave the front cover open. If you did close the front cover after replacing the drum, open the front cover.
  2. Press the Clear button.
  3. You will be asked if you are replacing the drum, press the Up button to answer Yes.
  4. Once the display says “Accepted”, close the front cover.

If the above did not work, try opening the front cover, pulling the drum and toner out, make sure the toner is seated in the drum properly, reinsert, and try pressing the Clear button again.

These instructions should work for models beginning with HL-228 and DCP-.

Updating to Windows 10

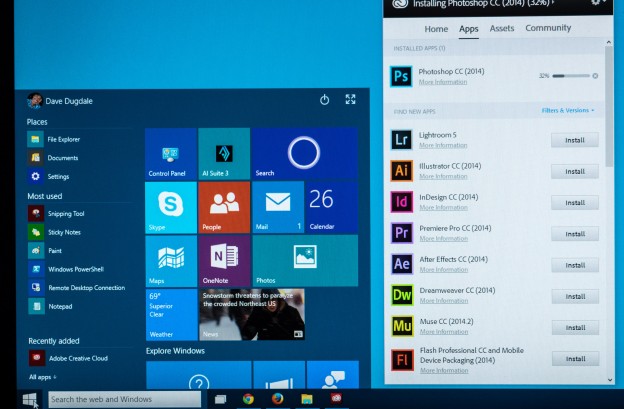
Photo credit: Dave Dugdale

I am both excited for and wary of the Windows 10 update that starts rolling out to those of us who have reserved our free upgrades.

The smart folks are going to tell you to wait until the first service pack rolls out before upgrading to Windows 10.

But I’m not that patient. And I’m not stupid either.

Here’s is what I’m going to do to prepare for the Windows 10 upgrade.

1. Backup

I’m already backing up my data, so I should be OK there, but I have not been updating the system files. Usually I just rely on the Windows system restore for that, but I’m not sure that will work on an upgrade.

I found a free solution.

EaseUS has released a free system backup tool called System GoBack that I have used to back up my system files. After I installed and ran the program, it takes one click of the button to start backing up the system files, and it will do it while you are working on other programs.

One thing that impressed me was that the default location it wanted to back up my files to was my second drive and not the main drive that Windows is installed on.

My backup was about 50 GB, so make sure you have enough room before you start the backup.

I’m not making any money on this recommendation. 🙂

2. Deactivating Adobe Products

Maybe I don’t need to do this, but I’m going to anyway. I’m worried that if for some reason that my older copy of Adobe Creative Suite won’t run in Windows 10, I won’t be able to deactivate it to install it on another machine. I’m really trying to avoid spending time on the phone with Adobe customer support.

Deactivating is easily done by opening an Adobe program, clicking “Help” and “Deactivate”. Make sure you have your serial numbers first!

Update: Deactivating Adobe products proved to be unnecessary.

3. Waiting For The Right Time

Based on previous upgrades, this may take an hour or more to complete. So make sure you have plenty of time and don’t need your computer for completing an important project.

Those are my recommendations. What are you going to do to prepare? Let me know in the comments.


Error installing Office 2003 on a Windows 7 PC

Error installing Office 2003 on a Windows 7 PC

I was trying to install Microsoft Office 2003 on a refurbed Windows 7 PC.

Everytime I tried to install, I got this error:

Error opening installation log file. Verify that the specified location exists and is writable.

Google searches kept mentioning this problem happening on Windows XP, and offered the solution of downloading a program from Microsoft that uninstalls Office. One, that program is no longer available on the Microsoft.com site since XP is not supported anymore. Two, my problem was a fresh install, not installing over a previous install.

One search result suggested looking at the install log. It said to hold the Windows key and press the R key, then type “%temp%” to open the temporary files folder for the logged in user.

That’s when I noticed the odd file path of the temp folder. After “C:\Users\” was the account name but it had what looked like an apostrophe instead of the dash that I knew was in the account name. For example, although the account was “PC-001” the file path was “C:\Users\PC´001”. I’m pretty sure that was not even a straight single quote that you get by pressing the key to the left of the enter key. It was angled like a smart quote or a proper apostrophe. Why change a dash to an apostrophe, Microsoft?

I’ve been around long enough that once upon a time, you could only use certain characters to name your files and folders. What if this older install program could not deal with the apostrophe in the folder name?

I set up a new Windows 7 account with a similar name, but used an underline instead of a dash, and the install program worked perfectly!

TL;DR

Using dashes and other odd characters in your Windows 7 account names may cause problems when installing older programs because the dashes get changed to apostrophes, and the older programs will throw errors because it sees an invalid folder name when writing to the temp folder.

Nexus 5 and the Airave

TL;DR

My Nexus 5 was showing low bars even when right next to my Airave. The problem was the Nexus was set up for LTE network, and the Airave is 3G. Thankfully I was able to change the network type of the Nexus by going to Settings > More… > Mobile networks > Preferred network type > 3G. Full bars again!

Story

I spent part of my tax refund on a Nexus 5. My Samsung Transform Ultra just couldn’t keep up with my demands.

The Nexus is so shiny and a lot bigger.

I found I was having a problem making calls and getting text messages. The bars were almost down to nothing, and I was sitting right next to my Airave.

I checked all the settings I knew to check on the phone, but it was still new to me. I even checked the Airave settings.

Thankfully, a Google search led me to this forum on Sprint’s community website.

On your phone, go into Settings > More… > Mobile networks > Preferred network type > 3G.

Once I did that, I had full bars again.

I had tried the other recommendations like updating the PRL (under Mobile Networks > Carrier Settings), but it did not work for me.

I don’t do a lot of downloading when I am away from a WIFI signal, so sticking with 3G instead of LTE is fine with me.

MMC cannot open the file C:\Windows\system32\eventvwr.msc

I ran into this error when I tried to run Event Viewer in Windows 7.

—————————
Microsoft Management Console
—————————
MMC cannot open the file C:\Windows\system32\eventvwr.msc.

This may be because the file does not exist, is not an MMC console, or was created by a later version of MMC. This may also be because you do not have sufficient access rights to the file.

I ran “sfc /scannow” in case something was wrong with the eventvwr.msc file, but the test came back clean.

I knew the sufficient access rights could not be the problem because I have admin rights.

I googled.

From the first google result, I followed methods 1 & 2, but got the same error. I did not bother with method 3 because it said to check the Event Viewer for the cause. Somebody was copy-and-pasting!

The second result held the answer to my problem. Granted the solution was for Windows Small Business Server, but it worked for Windows 7, too.

  1. Click the Start button.
  2. In the “Search files and Programs” box, type %appdata%\Microsoft\mmc and press the Enter key. The File Explorer window should open.
  3. Delete the files in the folder, or move them to another folder like I did just in case I was reading bad advice.
  4. Try to open Event Viewer again.

Event Viewer successfully opened!


Use Airrave with Ting to get better cellphone reception

Use Airrave with Ting to get better cellphone reception

So I really like my cellphone service, Ting.

One problem I have had isn’t really with Ting, it’s with Sprint, who Ting uses for their network. That one problem is that as excellent as the reception is everywhere else in town, the worse place seems to be my neighborhood.

Technically, we are in the coverage area, but I have to go outside or stay perfectly still in one corner of my house to keep a call from dropping.

I tried to fix the solution by buying a Zboost Metro which is a powered signal booster that connects to a window-mounted antenna . I think it did not work for me because there are too many obstructions between my house and the cell phone tower. I paid $140 for it.

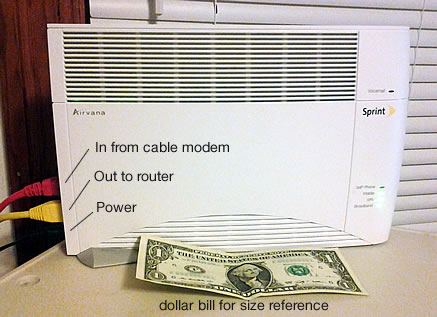
Thankfully, the solution comes in the form of the Airvana Airrave device. It acts as my own personal cell tower.

airrave_post

I just had to hook it up to my internet in between my cable modem and my router, then called Ting to get them to activate the device for me (activation was free).

The cost of a brand new Airrave is around $200. You can buy it from Sprint for $100 at the time of this writing, but you have to call to order it. A refurbished model at Ting is $120 (its availability varies). I bought mine on Ebay for less than $50. Ting was still very cool about activating for me.

I have had my Airrave for a few months now and I’m very happy with it. I get and make calls in my basement, which was impossible before.

It only takes up about a 12” by 3” spot on my shelf.

One feature some may find annoying is that your phone speaker will beep 3 times when receiving or making a call. That is there to let you know you are connected through the Airrave.

You can use it for VOIP, and there are connections for it, but I have no need for that function, so I have not tried it.

Is the Airrave right for you? If

  • your service uses the Sprint network
  • you have low reception at home
  • and you have high-speed internet

then, yes, you should get the Airrave.

How save money using Ting

How save money using Ting

I have already mentioned how I am saving over half what I was spending while with Spring since switching to Ting. Here’s how to save more.

Turn off your data when you are not using it.

I installed this free widget on my phone: Data Switch

It is a simple widget that you tap to turn on and off your 3G/4G data connection. Since Ting charges you depending on how much of their service you use, why use more than you have to?

Sure you could turn off sync, but there are still apps you may have running in the background that may still try to access the internet.

This way, those apps can only access the internet while you are connected to WiFi unless you turn the switch on again. This saves on battery, too.